
- Using the ILDAC Action button
- Connecting via Local Access Point
- Connecting via Network Wi-Fi
- Connecting via Bluetooth/Mobile App
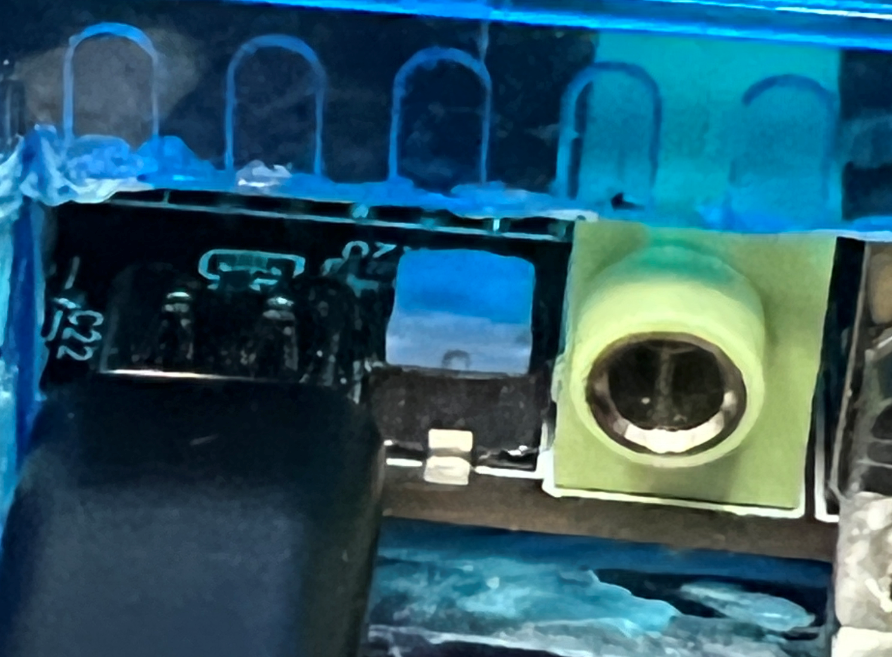
On each ILDAC-WAV unit next to the 3.5mm audio jack is a small push button (either black, light blue, or light grey). See photos below.
You may need to access this button through the hole in the top of the cover or from the side using your finger or a small screwdriver or key (depending on ILDAC version you have).
This is the 'Action' button. This button works by pressing the button and holding it down while watching the OLED screen.
Every two seconds, an 'action' will be displayed in the OLED screen for two seconds.
When you see the action you want to select, simply let the button go and ILDAC will execute that action.
The available actions, in order are:
Action button locations:
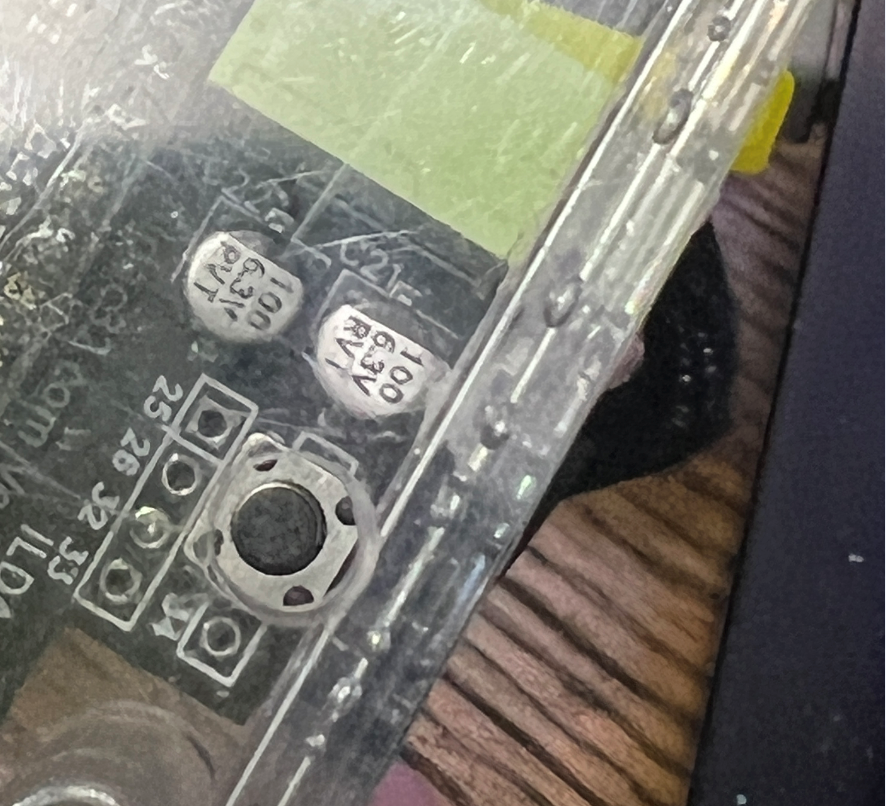
You may need to access this button through the hole in the top of the cover or from the side using your finger or a small screwdriver or key (depending on ILDAC version you have).
This is the 'Action' button. This button works by pressing the button and holding it down while watching the OLED screen.
Every two seconds, an 'action' will be displayed in the OLED screen for two seconds.
When you see the action you want to select, simply let the button go and ILDAC will execute that action.
The available actions, in order are:
- E-Stop (Stops all laser output)
- Enable Wi-Fi or Disable Wi-Fi
- Enable Network Wi-Fi or Enable Local AP (Selects Wi-Fi mode and this action is only displayed if Wi-Fi is enabled.)
- Start Bluetooth or Stop Bluetooth (Bluetooth is only necessary if you are using the mobile app)
- Enable SD Card or Disable SD Card (If for some reason the SD card becomes disabled, use this to re-enable)
- Reboot
- Factory Reset (Resets ILDAC to all factory settings and clears all Wi-Fi network connections)
- Cancel Action Button (Relesing here cancels the button and takes no action)
- To connect to ILDAC in Network Wi-Fi mode (i.e. connect to your local Wi-Fi network), please click the Connect via Wi-Fi Network tab above.
- To connect to ILDAC in Local Access Point mode (i.e. ILDAC will create its own local Wi-Fi network and you can connect your devices to that network), please click the Connect via Local Access Point tab above.
- To connect to ILDAC with Bluetooth to use the mobile app, please click the Connect via Bluetooth tab above.
- When shipped, the default startup mode for ILDAC-WAV is Local Access Point mode. If you want to switch to Network Wi-Fi Mode, follow the steps above to enable that mode.
- You can also force FACTORY RESET mode by holding down the Action button while applying USB power to ILDAC. This will immediately boot into Factory reset mode.
- To run ILDAC-WAV in 'headless' or 'unattended' mode (neither Wi-Fi or Bluetooth modes enabled), you can select both Disable Wi-Fi and Stop Bluetooth. This will take two boot cycles if both Wi-Fi and Bluetooth are enabled. Once both Wi-Fi and Bluetooth are disabled, you can still change the settings with the Action button to re-enable them if you need to change the settings. This options allows ILDAC to operate with maximum internal memory available.
Action button locations:
Connecting via Local Access Point
In this mode, ILDAC-32 or ILDAC-WAV creates its own local Wi-Fi Access Point. No external Internet access is needed to connect to and control an ILDAC unit. Please follow these steps to connect in this mode.- Make sure to select Enable Wi-Fi using the 'Action' button (see 'Action Button' tab)
- Make sure to select Enable Local AP mode using the 'Action' button (see 'Action Button' tab)
- Once the ILDAC reboots in this mode, look at the OLED screen for the local AP name and Wi-Fi password (the default password is 12345678). See the image below:
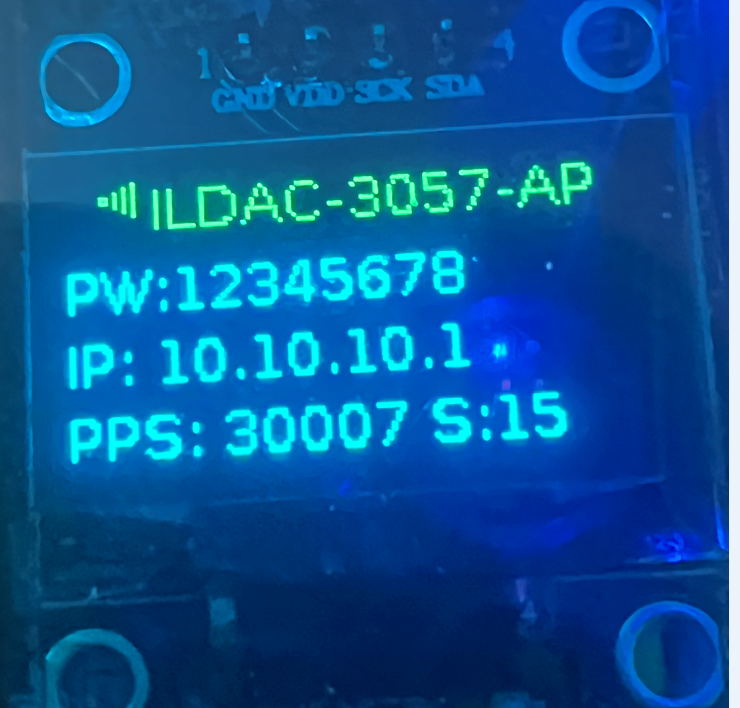
- Go to your computer or mobile device and connect to this Wi-Fi access point using the password in the OLED screen. The Wi-Fi SSID will always be in the format: ILDAC-abcd-AP where abcd is a unique code for each ILDAC unit. See image below.
- Once your computer or mobile device is connect to the ILDAC-abcd-AP network, you can go to a web browser on that device and navigate to this IP address:
10.10.10.1 and this will load the internal website to control ILDAC-32 or ILDAC-WAV.
NOTE: It may take about a minute to load the webpage the very first time as the browser is downloading all the web files for the web interface. This delay will only happen the first time. - Once Local AP mode is enabled, any number of computers or devices can connect to the access point and access the internal website at 10.10.10.1
Connecting via Bluetooth with the Mobile App
Please follow these steps to connect in this mode.- Make sure to select Start Bluetooth using the 'Action' button (see 'Action Button' tab)
- You can enable or disable Wi-Fi as you need. ILDAC can operate with both Wi-Fi and Bluetooth enabled at the same time.
- Download the ILDAC app from the App Store or Google Play
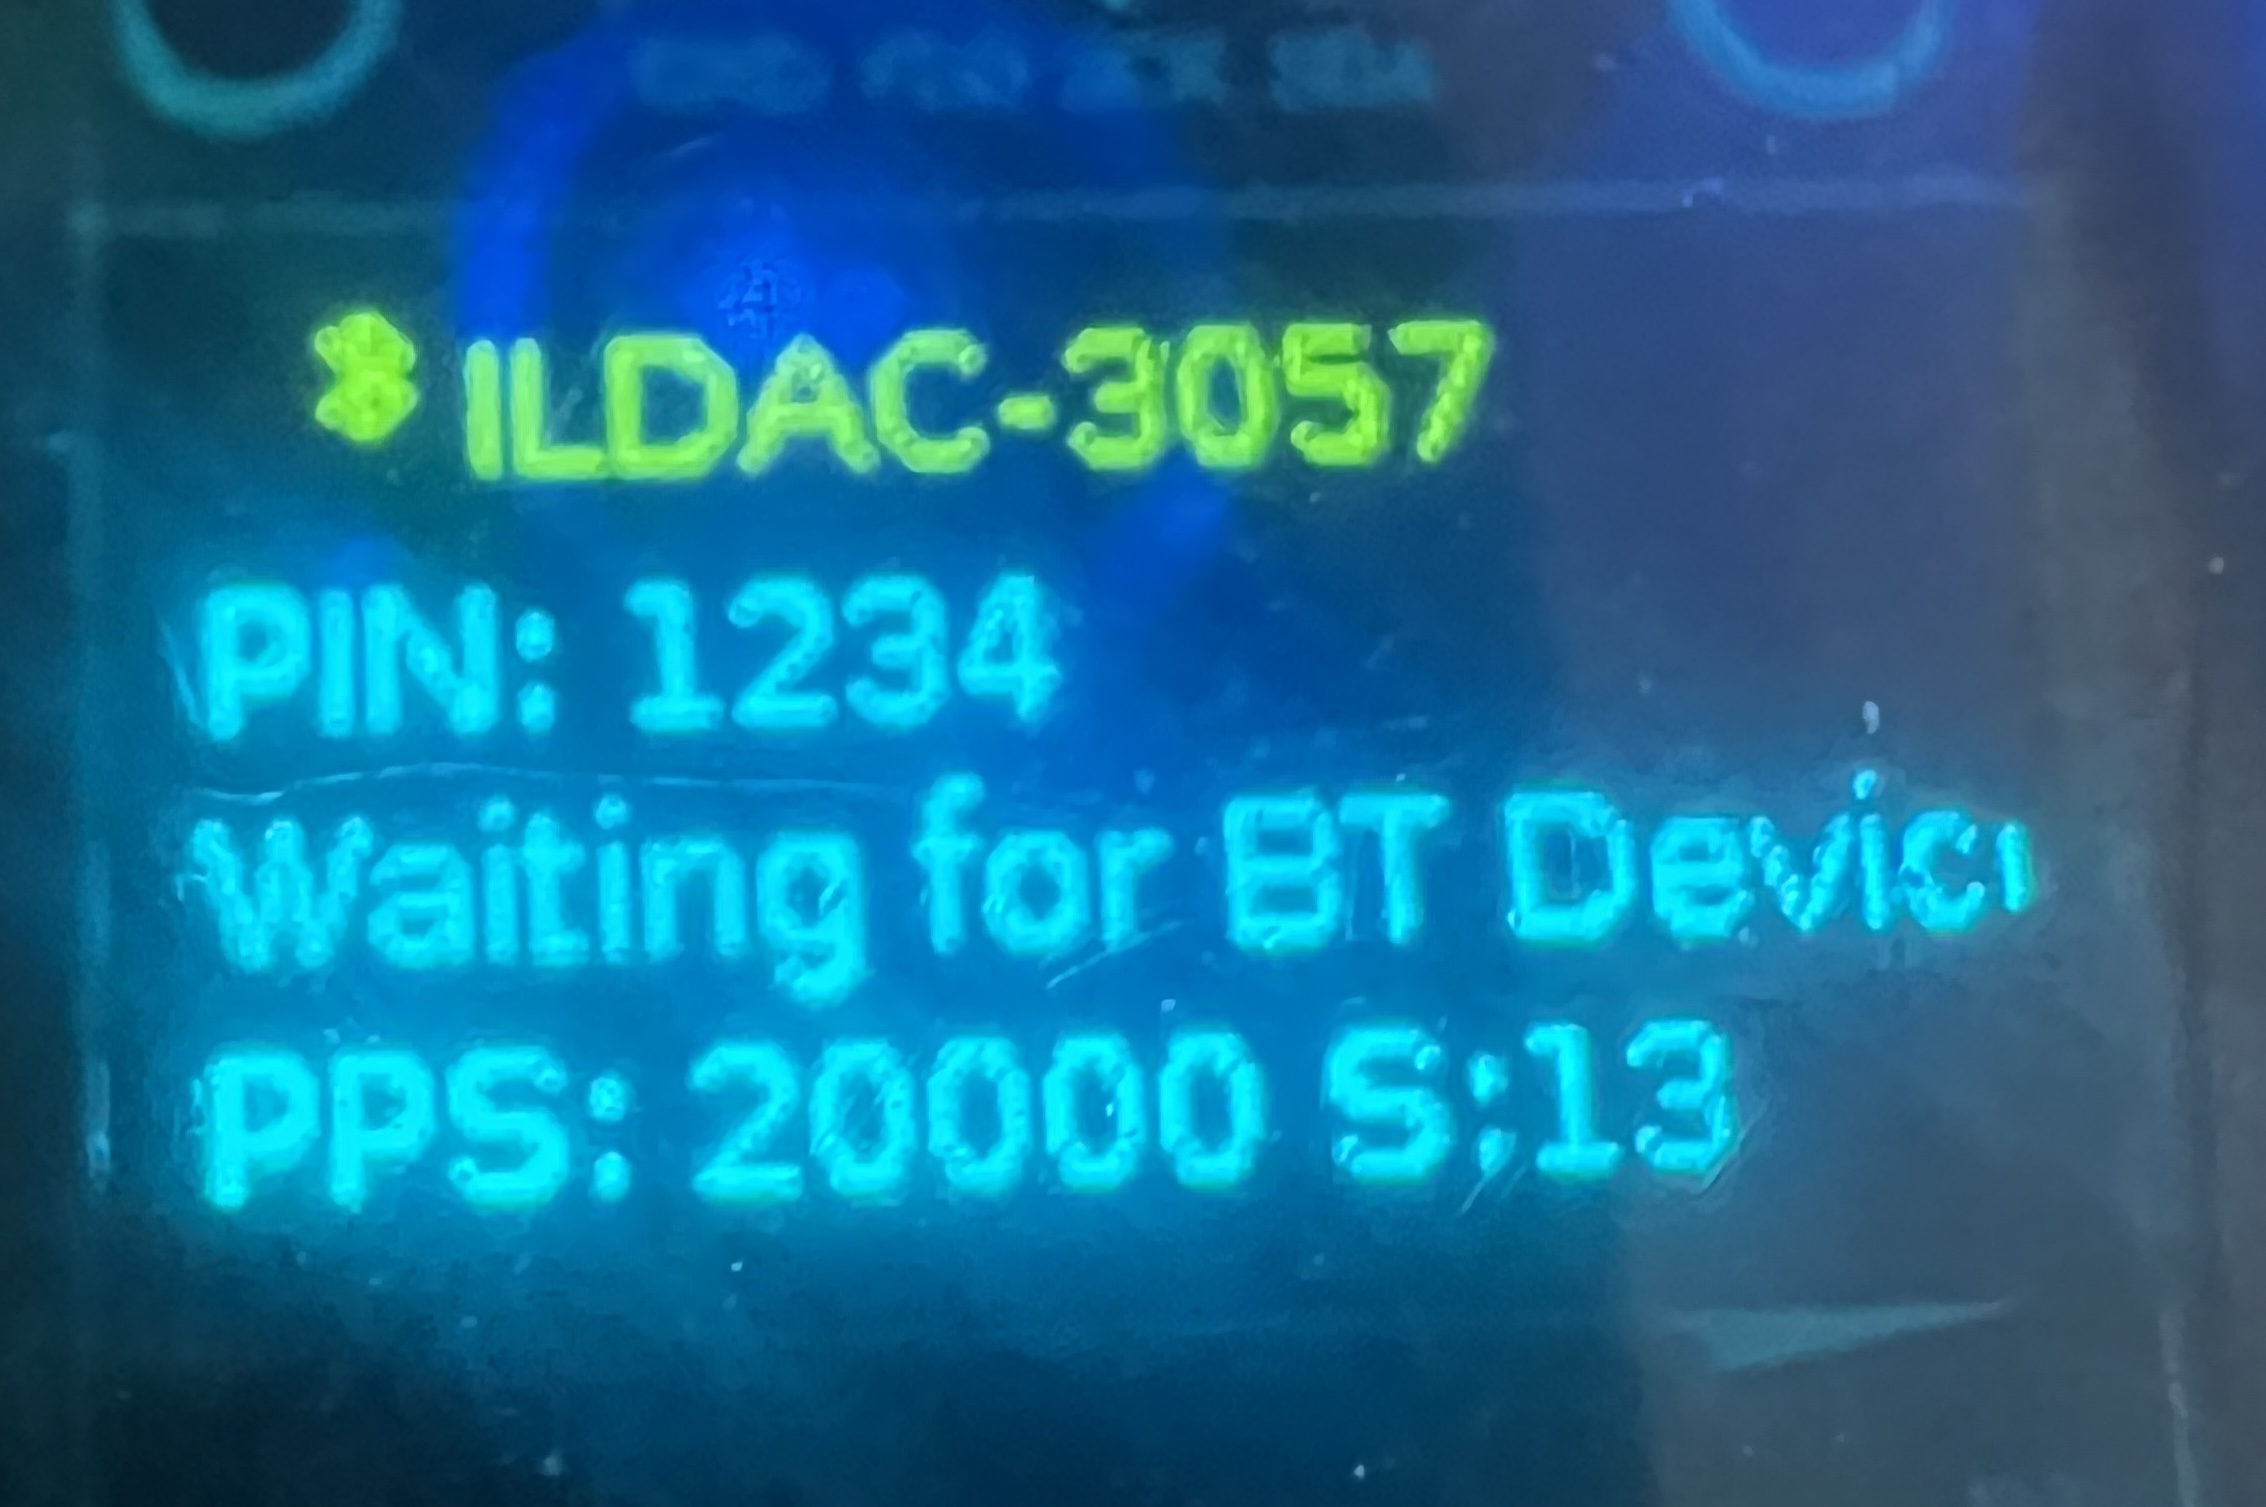
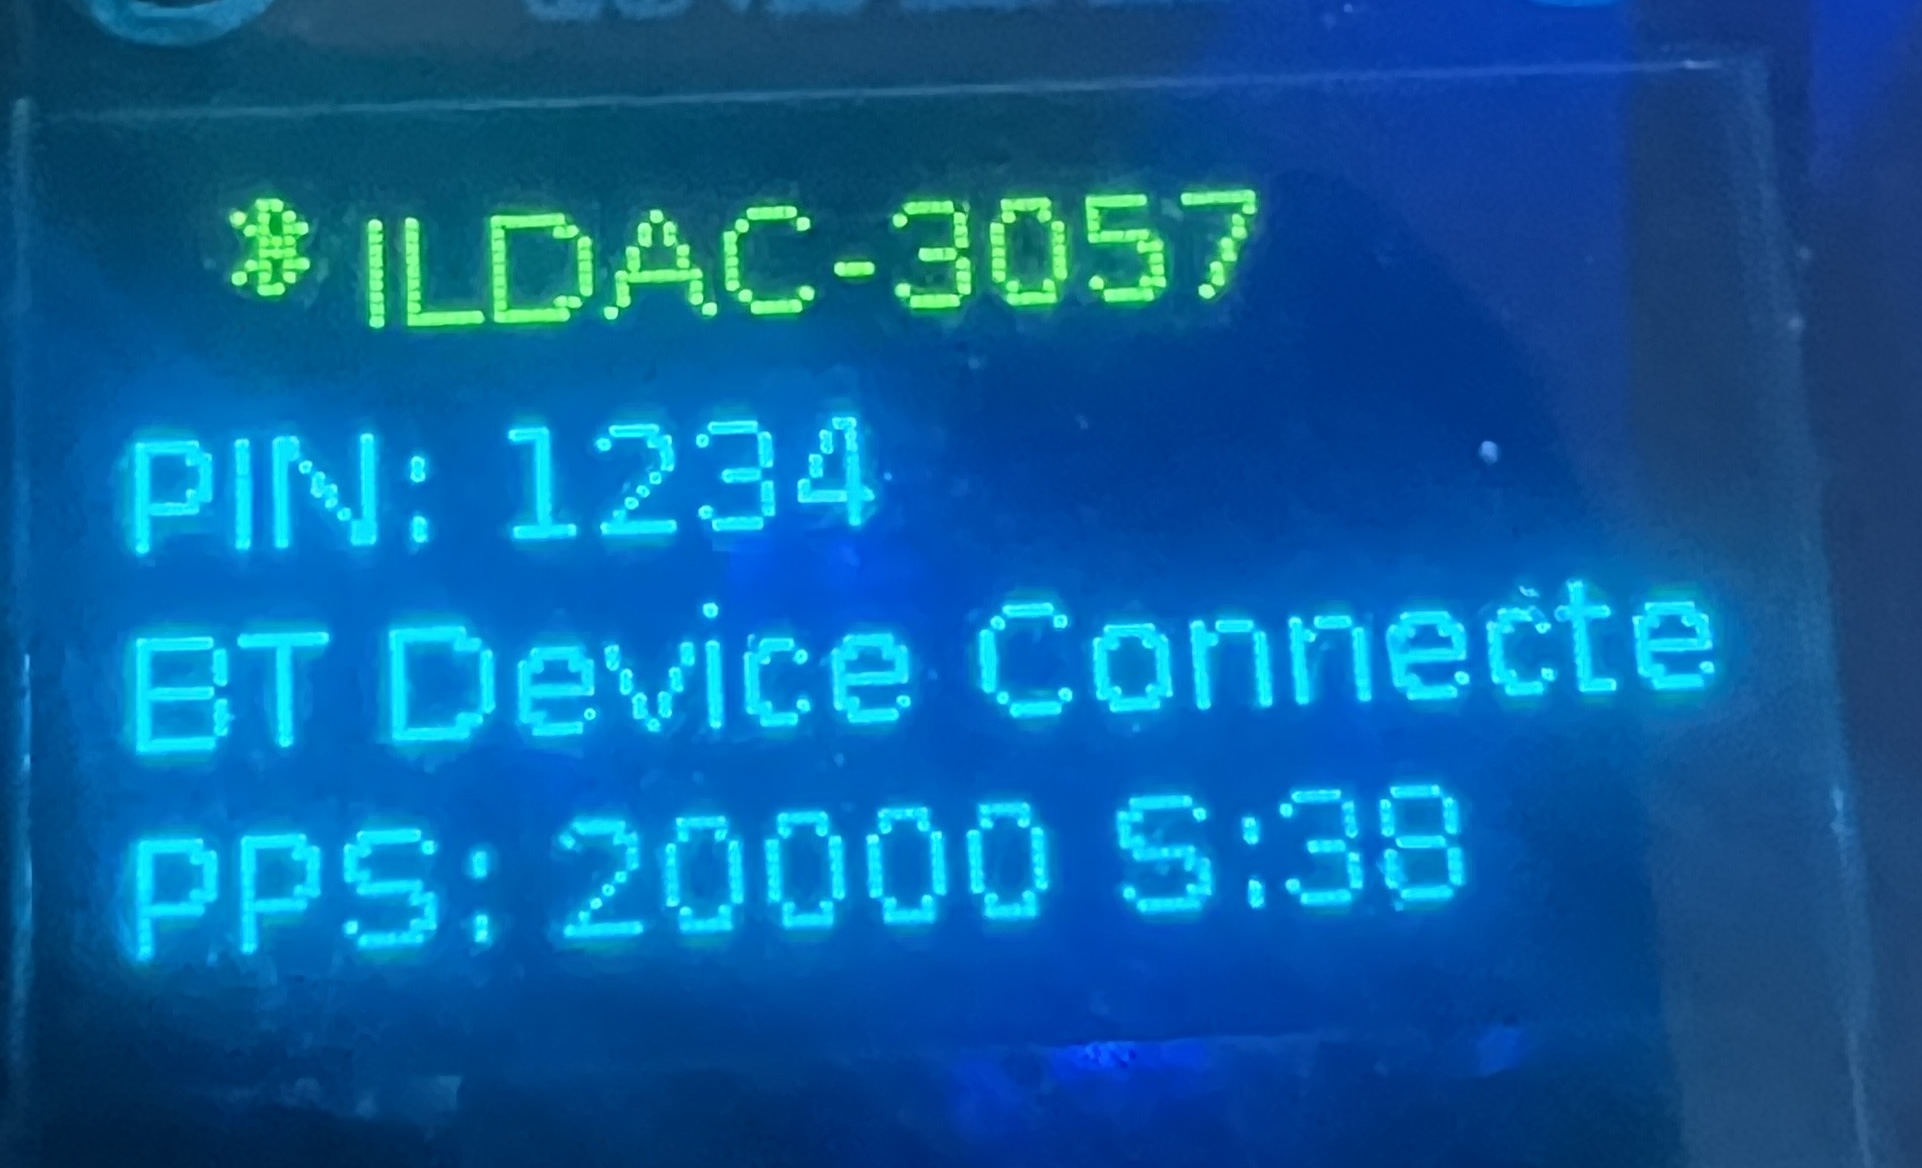
- When connecting via Bluetooth, the device name and the PIN will be displayed in the OLED display on the ILDAC during startup.
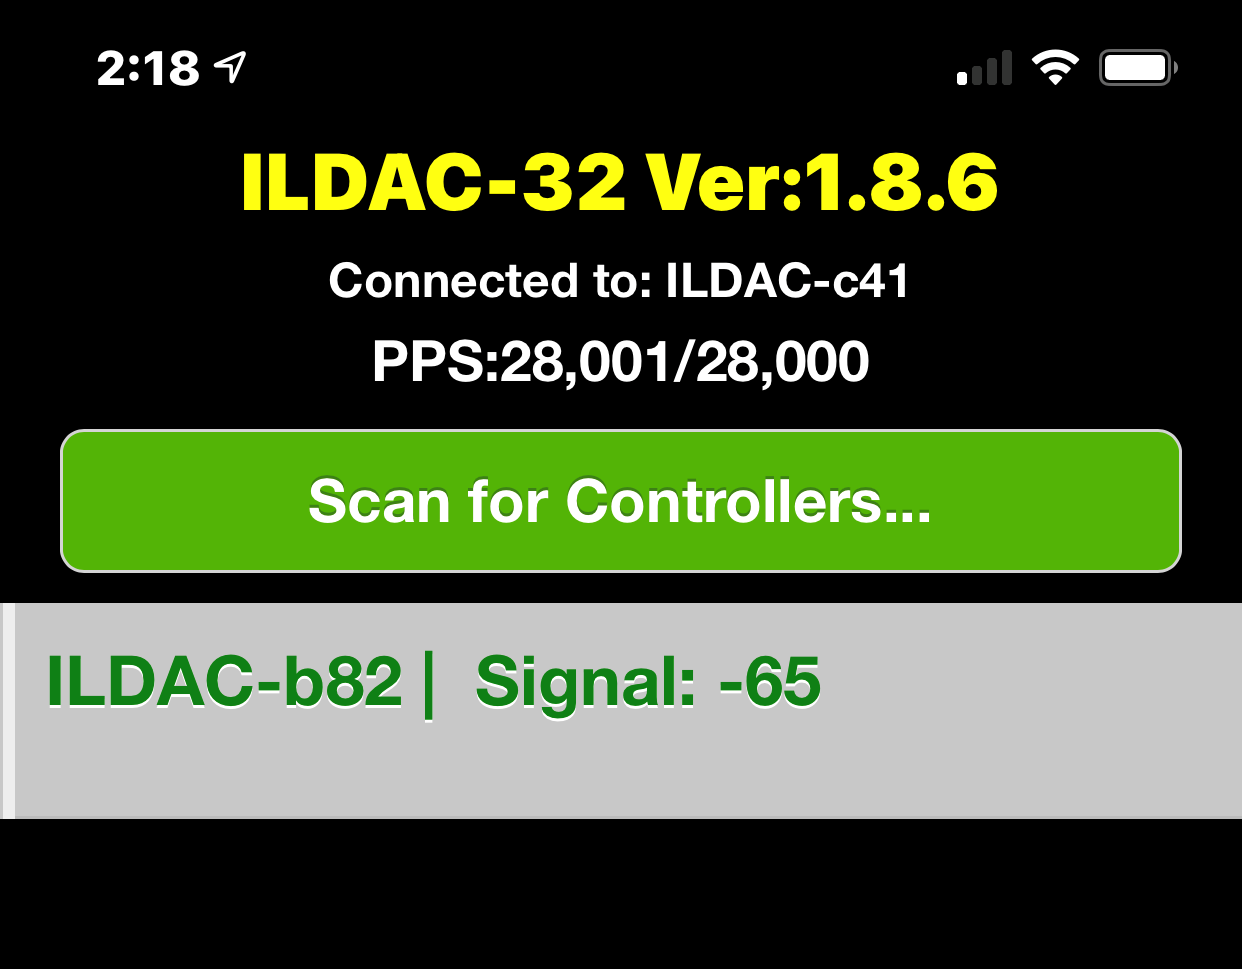
- Connect via Bluetooth first: Open up the app and you should see the ILDAC name listed under the "Scan for controllers" button like below. Click the grey bar to connect to ILDAC:
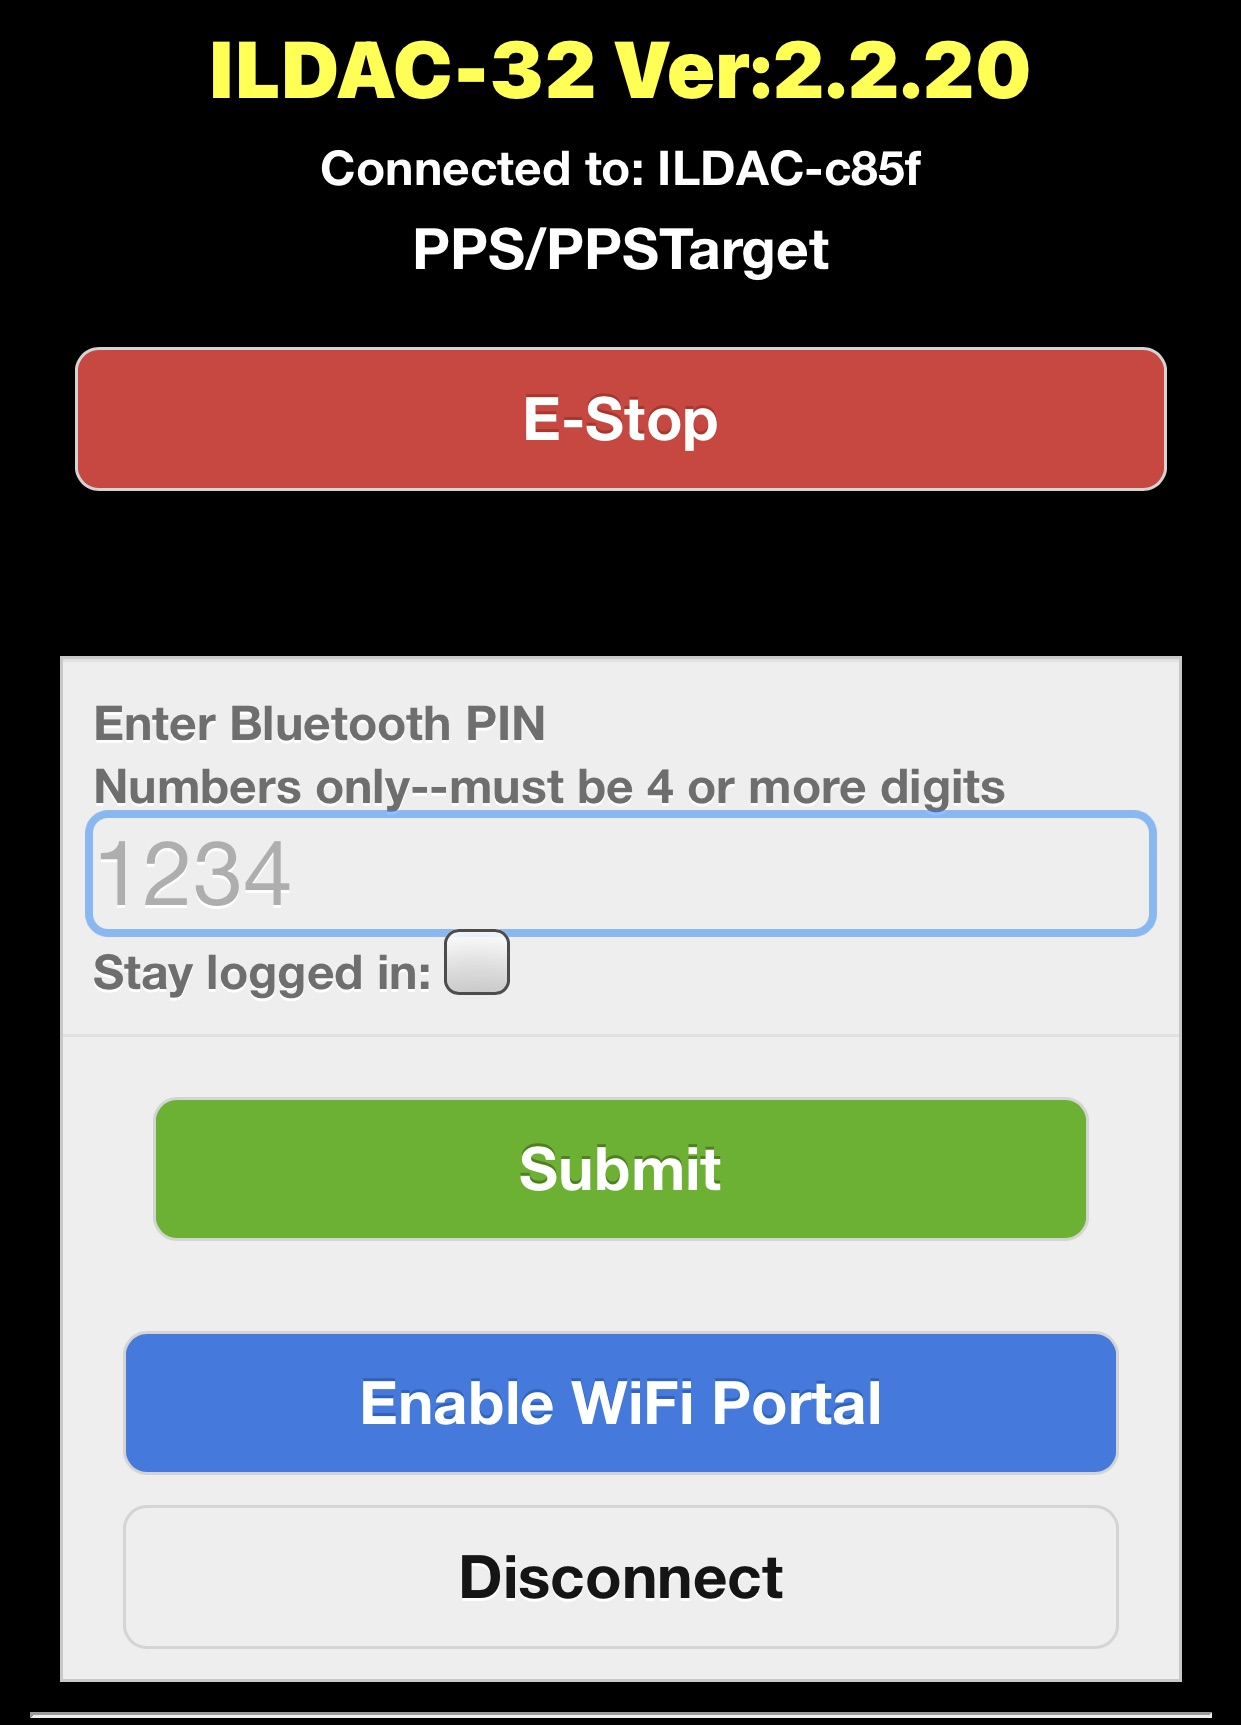
- Enter the Bluetooth PIN/passcode. The factory default passcode is: 1234. The PIN/passcode will be visible in the OLED display on the unit.
- Once connected, the OLED screen will show this:
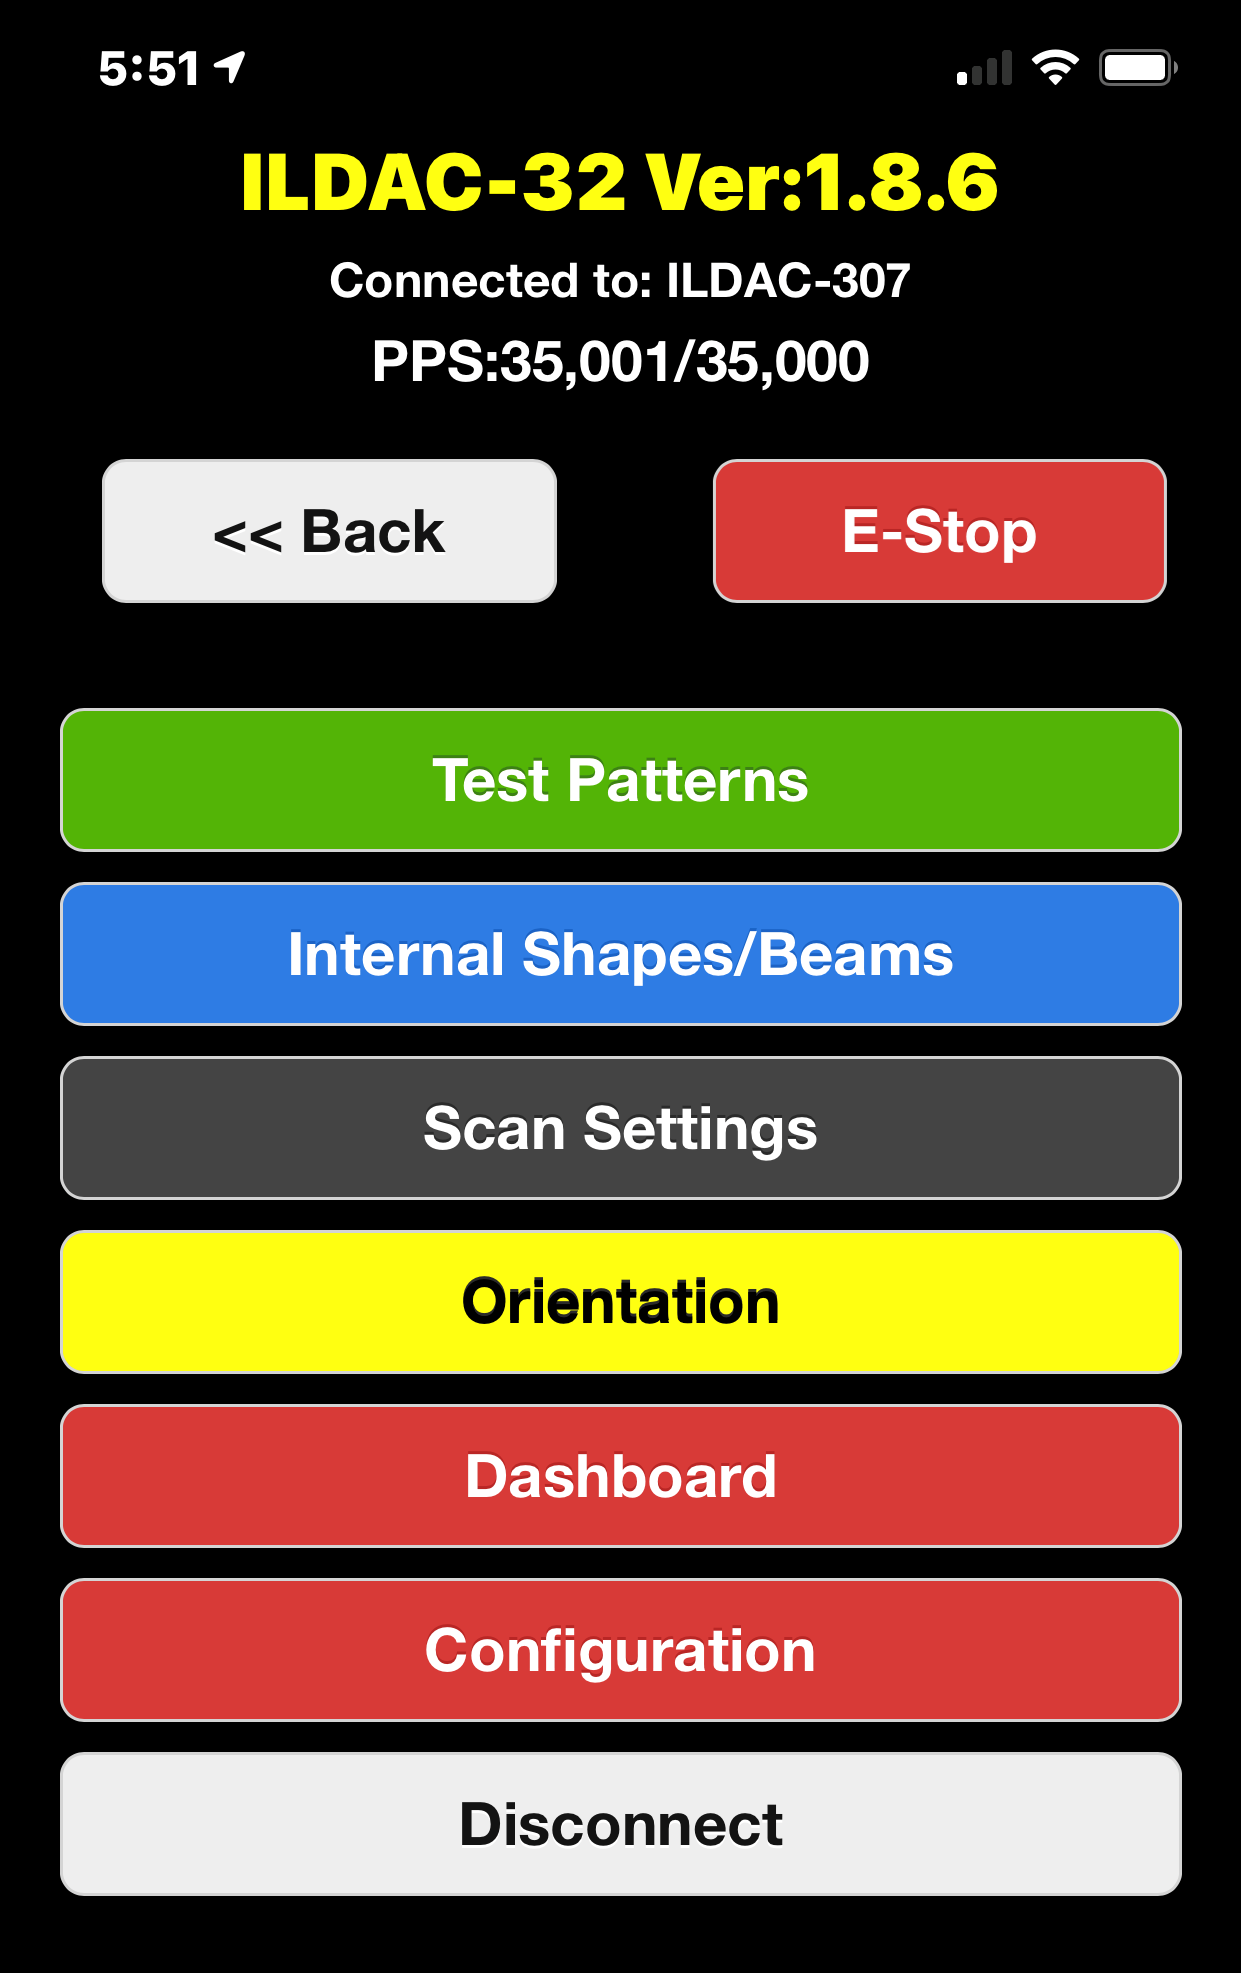
- Once logged in, the main app menu should appear as below.
- You can now select different test patterns or adjust other projector settings. Please note that the mobile app does not yet support playing ILDA or WAV files from the SD card.
- If the ILDAC is also connected to Wi-Fi, you can find the IP address of the internal web browser by looking at the "Dashboard" in the Mobile app, like below.
- There's also a link below the IP address to open ILDAC in the web browser of your mobile device.
Connecting via Network Wi-Fi/Router
In this mode, ILDAC-32 or ILDAC-WAV will create a temporary SSID so you can connect directly to the ILDAC and then provide your own Wi-Fi network credentials. Once set up, the ILDAC will reboot and join your own Wi-Fi network, and then you can access the ILDAC webpage from any computer or mobile device on the Wi-Fi network.Please follow these steps to connect in this mode.
- Make sure to select Enable Wi-Fi using the 'Action' button (see 'Action Button' tab)
- Make sure to select Enable Network Wi-Fi mode using the 'Action' button (see 'Action Button' tab)
- Once the ILDAC reboots in this mode, look at the OLED screen for the local AP name and Wi-Fi password. See the image below:
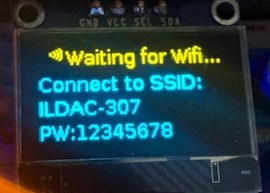
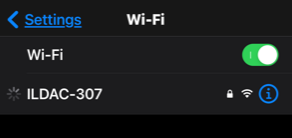
- Go to your mobile device (or Mac) and connect to the "ILDAC-xxx" SSID and password (default password is: 12345678 and can be changed later)
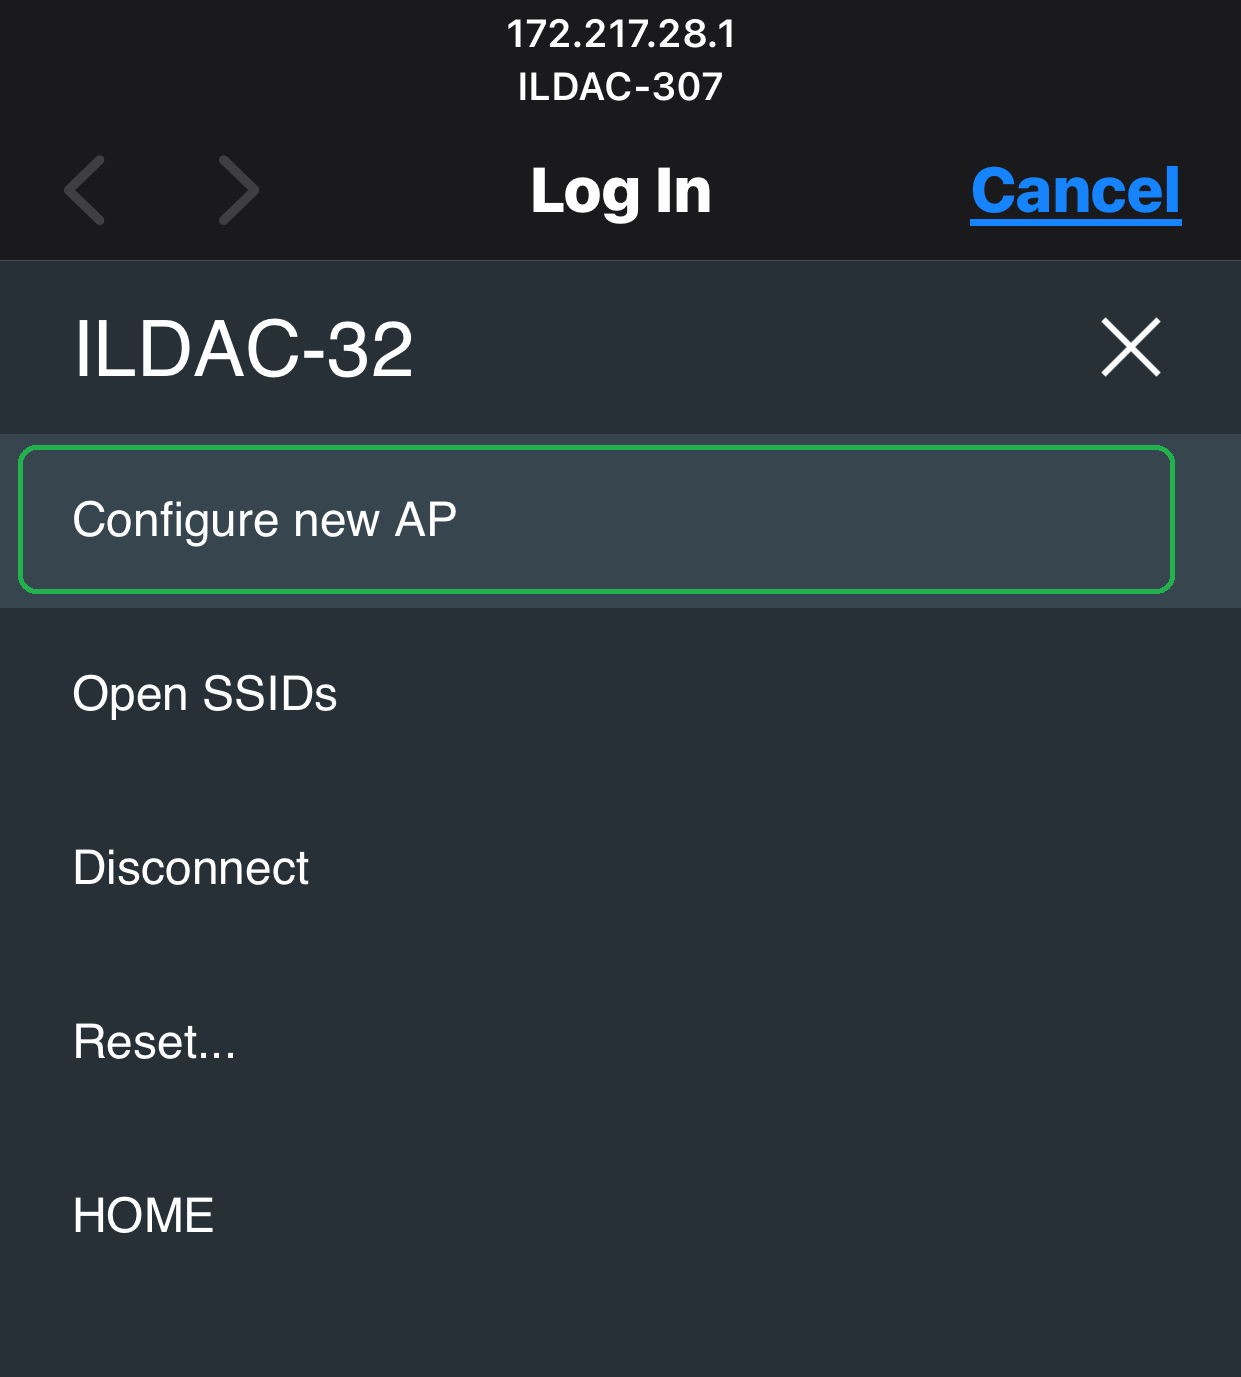
- Once you are connected to the internal Wi-Fi network, you'll see a captive login page like below. Click on the ≡ ("hamburger") icon (top right):

- Select "Configure new AP":
- After 30-45 seconds or so, a list of local Wi-Fi networks/SSIDs should appear.
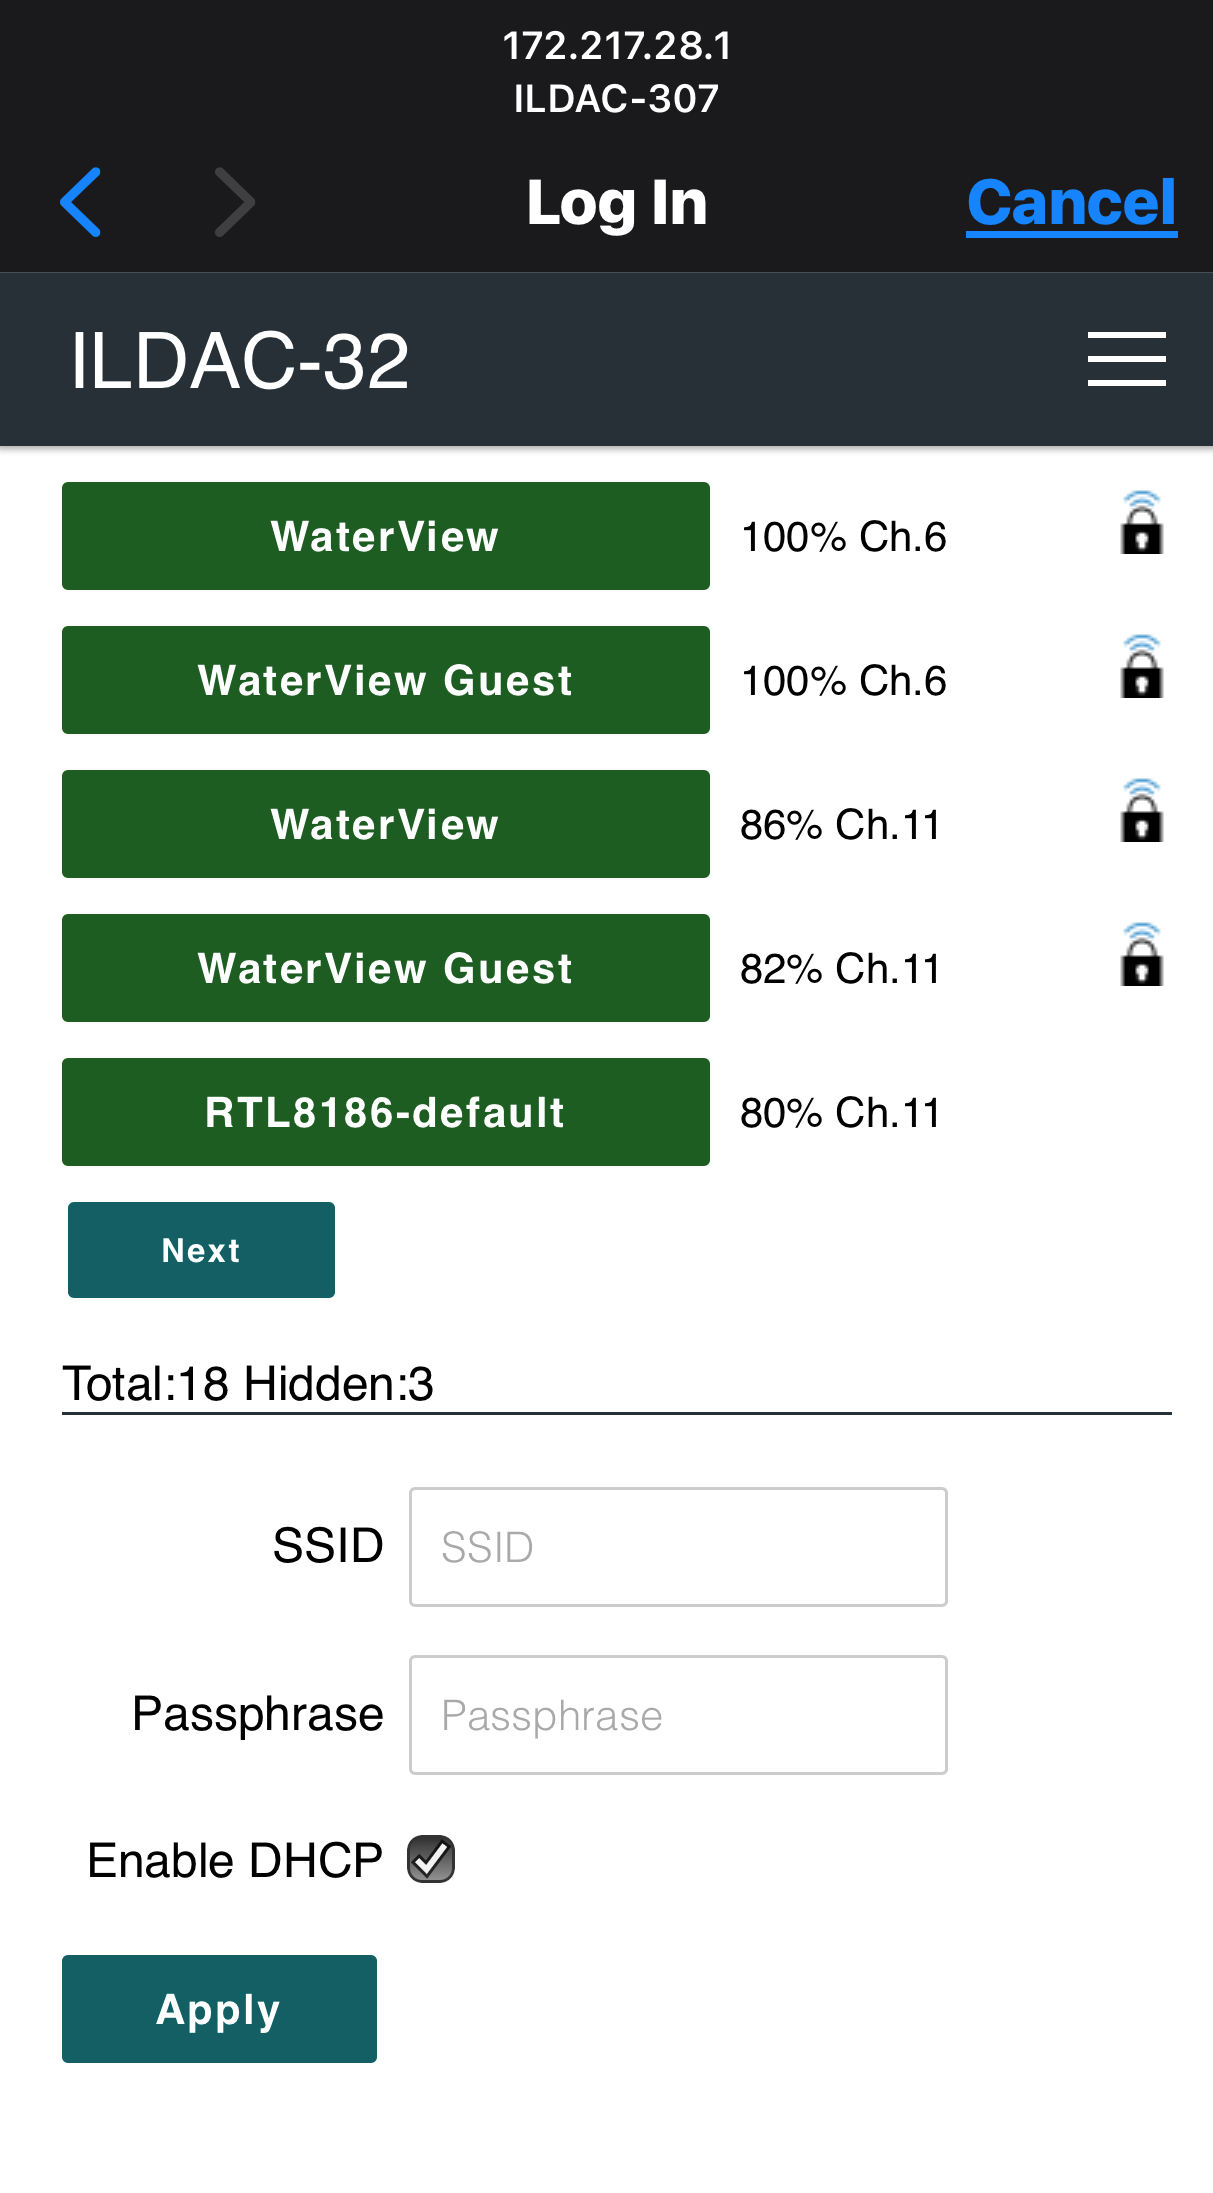
- Select your Wi-Fi network SSID (green bar), and then enter your Wi-Fi password and click "Apply".

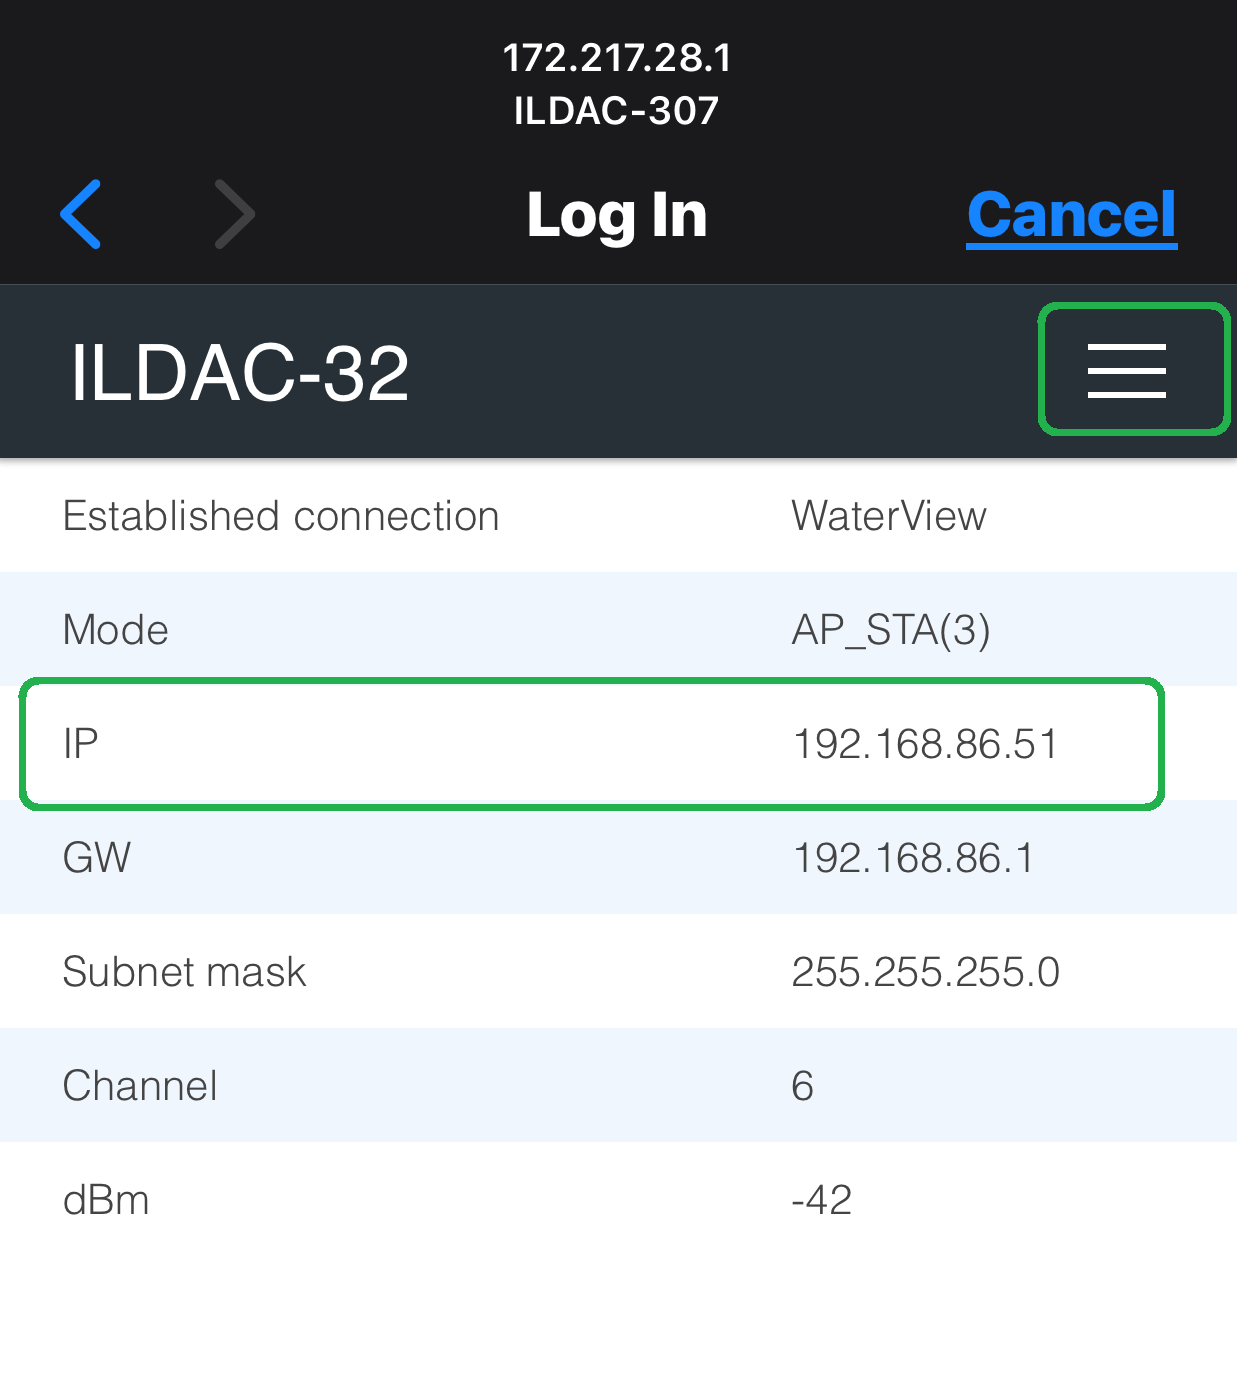
- Once the ILDAC successfully connects to your Wi-Fi network, you'll see the page below on your phone.
Also, ILDAC will reboot and connect to your Wi-Fi network.
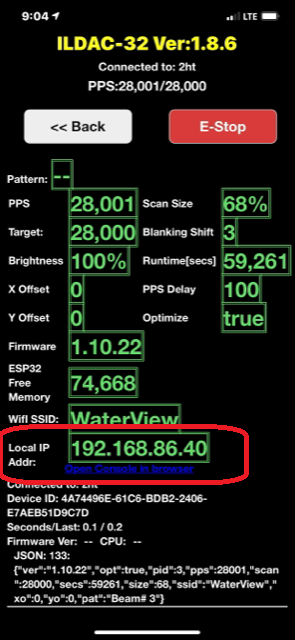
Take note of the IP address on this screen -- it is the local IP address you can now use to connect to the ILDAC using any web browser.
- The OLED display will also indicate the SSID and local IP address to use to open the internal web browser. In this mode the display lines are:
Line 1(yellow): Your Wi-Fi SSID.
Line 2: Local IP address to connect to ILDAC.
Line 3: Current ILDAC Firmware version
Line 4: Current Points-per-second (PPS) being displayed and the total uptime in seconds (S).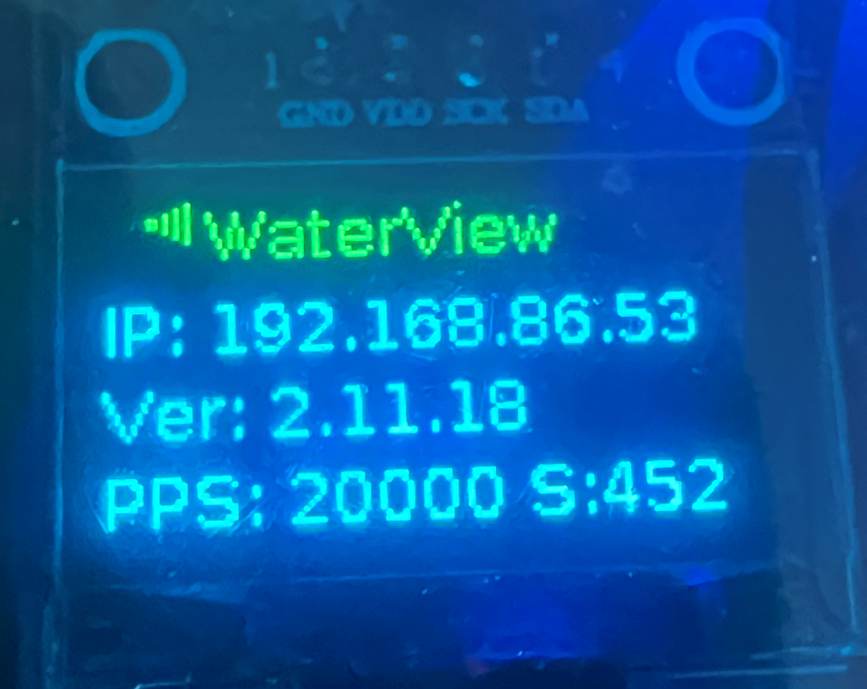
- Once you go through these steps to configure your local Wi-Fi network, you won't need to do it again. Every time you start ILDAC, it will automatically try to connect to your Wi-Fi network. Always watch the OLED display for startup status information.
- If you are ONLY using ILDAC at your location on your own Wi-Fi network, once you connect to the web app, you can click: "Bluetooth Disable" to turn off Bluetooth and free up some memory to run larger animated ILDA files. If you are running any WAV shows, you must disable Bluetooth for optimal performance (see 'Action' buttons page to disable Bluetooth)